Documentation
Getting Started
General
Upgrade
Current version 1.0
Email Setup
Configure how you want the application to send your emails. You can either choose SMTP or Mailgun’s API service. To configure your email please follow the following steps:
- Go to Email> Configuration
- Now choose “SMTP” or “Mailgun” based on your preference and fill up the rest of the form. If Mailgun is selected then you have to provide the domain that you registered on Mailgun and the Mailgun key. If SMTP is selected then enter the correct SMTP credentials
- Enter an email in the “Email from address” field. The email address will be used to let your recipients know where the email came from

Disable Email
Check the box if you want to disable email functionality from your system
Disable Email/Job Queue
Job queues are used to give a better user experience by delaying the time-consuming tasks such as Sending Emails, until a later time. When the system needs to send an email that triggered from a user’s click of a button, instead of sending the email right away it keeps a record in database as a job to perform later.
In order to utilize this functionality, you need to make sure that you have setup CRON or using Supervisor to Manage Laravel Queue Processes
Check the box if you do not want this feature. (But it is suggested that you do)
Setting up CRON
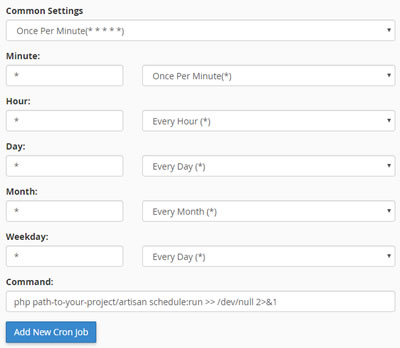
You need to setup only one cron job for the entire application. The method of setting up a Cron can be different based on your hosting provider. But generally, this is how you setup your cron. First, login to your cpanel and navigate to the Cron Setup page and configure the settings like following

- Change path-to-your-project/ with the path to the application on your server
- Make sure your cron is running on the correct PHP version. Sometimes your cron may run on top of a different PHP version than what your project is running on, so please be aware of that.
If your server’s default PHP version is different from the required PHP version of the application, it is most likely that you need to specifically mention the required version of PHP in the command like following:
/opt/php71/bin/php /home/your_domain/path_to_project/artisan schedule:run >> /dev/null 2>&1